Showing posts with label tutorial. Show all posts

November 26, 2012

DIY Polymer Clay Necklaces

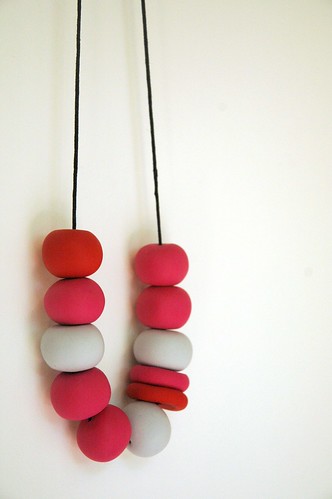
Polymer Clay beaded Necklaces
My handmade Christmas is well underway here in an attempt to stay organised and not too stressed. Last weekend I made up these necklaces for Miss 4's preschool teachers.  I first spotted this fantastic idea over at Pip's and thought it was worth a go.  It totally was!

Polymer Clay beaded Necklaces

They were such fun to do, really quick and easy, and something that Ellie could help with threading for her teachers - exactly the kind of project I needed for my teacher gifts. Unfortunately the teachers always seem to be the last thing I get to, and I really try to avoid giving chocolates (having seen the amount of food my teacher friends receive - enough to last the century!!).


How to!

A few of my friends have already asked me how it's done, so here's how I made mine (I'm sure there are lots of different ways!):

1.  Head to your local art/craft shop and buy some 'Fimo soft' polymer clay (or 'Sculpey' as an alternative) as well as some durable / strong cord.  I just used cotton braided thread.  I got about 10-14 beads out of one 85g packet, but you may get more or less depending on the size of your beads.

2.  Cut your clay evenly on a hard surface -  dividing the clay into even portions will obviously give you beads around the same size.   I worked with mine on the dining table protected by baking paper as the colour does come out of the darkly pigmented clay.  If you don't want any colour to mix between beads, my advice is to change your baking paper and wash your hands for each colour used as there are a few clay crumbs.  If you want, you can combine and marble colours.  There are some good youtube videos on how to do that, but I preferred mine as a block colour for now.

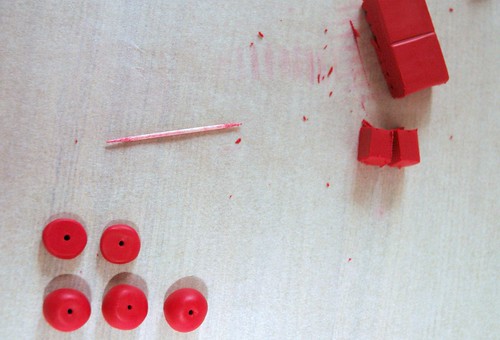
3.  Form your beads to a desired shape and create a hole big enough to thread, depending on the thread you're using - I used a toothpick for mine, but you really could use anything that works in the same way.  Make sure you check the hole size before you bake the whole batch,  the clay should be firm enough to do this.  The sky really is the limit with the shapes and kinds of beads you make - be creative and try something really interesting!

4.  Lay the beads onto baking paper lined tray and bake exactly as directed on the packet.  Take care with the oven temp and length of time you bake - I used a separate oven thermometer to ensure it didn't overheat as I have heard that the fumes from overheated polymer clay aren't too healthy.

5. Once cooled completely, thread onto string as desired and tie a secure knot.

6.  Gift (or wear) your lovely new necklace!


For me, the hardest bit was regulating my oven temperature to 110 degrees C as my thermostat is completely hopeless but despite that,  this batch came out well, so I'm planning on making a couple more batches for special people and stocking fillers.  I'm also giving myself a few days between batches as rolling out the clay gave me a bit of a sore hand for the rest of the day (nothing serious but pace yourself and don't overdo it with hundreds and hundreds of beads. Trust me, I know a bit about hands).
Polymer Clay beaded Necklaces


I hope they appreciate the idea - what do you think?  Would you like to receive something like this?


March 21, 2012

Pink Pincushion

Life has been rough here the last couple of weeks.  All members of my little family have fallen ill, with husband developing early Pneumonia, toddler with asthma, and finally 8 week old to get sick with a horrid respiratory bug.   Not nice.  Therefore not much chance to jump on the machine, but I did squeeze in this pretty pink pincushion for my lovely sister who is learning to sew.  You can't go past a bit of liberty, solid pink, natural linen and a vintage button for a cute gift.

Pincushion for Jo

Tutorial from here if you'd like to make one too. 

March 17, 2011

My creative space.

A little gift for a friend who is just starting to sew.  Some crisp new linen with one side new season liberty and the other a vintage cotton to complete a simple and satisfying project.


If you'd like to make one similar, you can find a tutorial here.

And don't forget, as always, you'll find lots more creative spaces at Kirsty's.


December 16, 2010

Cheaters doll quilt

Really, really cheating, but I don't care.   A tiny little blanket for a tiny little friend.

25 minutes from fabric selection to photo finish.


No real tutorial needed for this one - this is how my 25 mins was spent:

  1. Select faker patchwork fabric from Nanna's (now mine) scrap stash with 2 year old who "needs a pink blanket" all of a sudden for Eduardo (tiny Emu friend) [2 mins]
  2. Cut fabric to selected size and also cut an identical piece of scrap fleece leftover from this project [3 mins]
  3. Sew around border with right sides together, turn out right way and topstitch the same again [5 mins]
  4. Sew over pretend patchwork lines whilst fending off 2 year old trying to reach pins on the table [10 mins]
  5. Cut loose threads and press [2 mins]
  6. Settle Eduardo Emu to sleep under his new blankey and take a picture or two [3 mins].


I think Eduardo was pretty chuffed with his new quilt.  He snuggled down and went off to sleep pretty quick.


September 10, 2010

Little Butterfly Shirt: Tutorial

So, after having a bit of interest in my little butterfly shirt, here's the tutorial so you can make one for your little butterfly too!


Materials Needed:
  • One plain t-shirt, singlet or long sleeved t-shirt
  • Three small pieces of different patterned fabric for butterfly applique (scraps are great!)
  • A 30cm x 20cm piece of tulle
  • Double sided fusible applique webbing
  • 10cm x 10cm piece of medium weight fusible interfacing or tear away stabiliser (to enable embroidery on a stretch t-shirt)
  • Scrap paper to draft your butterfly wings
  • Coordinating Embroidery thread and needle
  • Coordinating Sewing Thread
  • Coordinating ribbon (15cm length)
  • Sew-on or glue on sequins in a coordinating colour
  • Disappearing ink/washout fabric marker


PART 1:  BUTTERFLY APPLIQUE


Step 1:  Draft simple shapes on paper, and then from your fusible applique webbing cut out:
  • 2 x large wings 
  • 2 x small wings 
  • 1 x butterfly body 
Step 2:  Place cut out webbing pieces onto the wrong side of your chosen fabrics and fuse following the manufacturers instructions.  The paper side of your webbing should be facing up.  You should be able to iron over the paper in order to fuse your webbing, however, do follow the instructions on the product you're using. 

Step 3: Cut your fabric pieces around the outside of your paper so that you have the following:
  • 2 x large wings  (fabric 1)
  • 2 x small wings (fabric 2)
  • 1 x butterfly body (fabric 3)
The right side of the fabric wing should look like this:

The wrong side should look like this: 

Step 4:  Lay your pieces onto the right side of your t-shirt front and position in the centre so that the wings and body overlap slightly.


Step 5:  Peel off the backing paper and iron on each part of your butterfly, doing the large wings first, then the small wings and finally the body.  (NB:  You are ironing on the right side of your t-shirt and butterfly wings.  Remember to use a heat setting suitable for your t- shirt too, not just your applique fabric).


Step 6:  Decide on a  method of stitching.  I fused a sample wing to some scrap fabric and tried out a few different stitches.  You could choose a hand running stitch, blanket stitch, straight machine stitch or something else you prefer.  I preferred the look of a plain straight stitch on the machine.


Step 7:  Using your desired stitch, sew around the border of each wing and butterfly body in a coordinating thread.


Step 8:  Using a disappearing ink fabric marker, sketch two antennae on your shirt.  (If you're using a soft and stretchy t-shirt material, you may need to fuse a piece of interfacing or tear away stabiliser on the wrong side of the fabric behind the antennae to enable you to embroider them neatly).  

Step 9:  Embroider your antennae using a backstitch or stem stitch with a coordinating thread.


PART 2:  BUTTERFLY WINGS

Step 10:  Take your piece of tulle and handsew or glue a few sequins along the left and right borders (leave the centre of the piece free for gathering and sewing).

Step 11:  Take your piece of embellished tulle and pinch at the centre.
Step 12:  Sew along the pinched and gathered centre with your sewing machine.  Reinforce it a few times to ensure it's secure.


Step 13:  Wrap a small length of ribbon around the centre and pin in place.  Sew this piece of ribbon around it's border to secure.  You're nearly there!  Now you just need to attach your wings.


Step 14:  Pin and sew your completed wings onto the centre back of your little butterfly shirt, sewing over the same stitching line around the border of the ribbon.


Hooray!  You're done!  The front of your shirt should now look something like this:


And the back like this:


Step 15:  Find a sweet little butterfly to wear your new creation!


Happy dress-ups!


September 9, 2010

My creative space.

Pretty much zero grown up crafting going on here this week.  I've tried, really, I've tried.  But I just can't get to it when I'm told there are more interesting things to do.
"Please Mama?"
How can I say no to that?

Instead, I've been outside on warmish sunny afternoons painting pictures with someone who loves it.   She was right.  It doesn't get any better really.


Head on over to Kootoyoo for the mega list of creative spaces but keep one eye on this space for some tutorial action here tomorrow.  :)

April 4, 2010

Happy Easter!

Happy Easter everyone!  I hope it's been wonderful. We've had a great day celebrating with friends, enjoying great food and even better company.   I'm so thankful for all of these people in my life, and even more thankful for God's grace, which I'm especially reminded of this weekend.

This week in preparation for today, Ellie and I made these little Easter Cards:


First we made up a couple of pages of very pretty (and fun to make!) Ellie artwork and let them dry overnight.


We got together some scissors, precut card stock, glue and paper doilies.


Then we glued the doilies to the paper, and cut out (mummy job!) some easter egg shapes.  A little more glue and Voila!  Our Easter cards were done.   Really, you could make any sort of shape with this quick method.  Hearts, stars, letters, flowers, any shape at all.

Out they went today to our lovely friends.


We hope they liked them, and we also wish you all a HAPPY EASTER in whichever way you spend it!

xx

November 3, 2009

Linen Drawstring Giftbag Tutorial


So, Christmas is coming.  If you're like me, then you may normally say 'Meh. I have heaps of time.  I'll deal with that after I've done all of this'.  But wouldn't it be nice to cut back just a little on the last minute stress?   Start thinking about it a little bit sooner? Make at least something handmade?  Even if it's small?  Because handmade is cool.  And means a whole lot more.

So I started thinking about Christmas, made this little bag over the weekend, and thought I'd share how I did it with you.

Obviously, the method isn't that hard, or anything remarkably new.   I just wanted to share how I did it, and how you might like to do it too if you're not sure how.

So, here we go....


MATERIALS NEEDED:


Sewing Machine
20 x 40cm piece of linen fabric for bag exterior (lightweight would be best)
20 x 40cm piece of lining fabric (I used Japanese cotton, but a vintage/thrifted cotton would also be lovely)
VIntage crochet doily (bear in mind the more open weave your doily is the harder it is to applique on)
Matching thread
Matching ribbon or string of your choice


METHOD:


1. Press all of your fabric pieces and doily.


2. Cut out your fabric.
  • You need to cut a piece of linen to the size you require for your bag.  Mine is 16cm x 38cm.  Make larger or smaller depending on the size of the gift you're giving.
  • Cut your lining to the exact same size.
  • You should have two rectangles like in the picture below:


3. Position your doily on your linen.
You have lots of options here.  You might like to cut your doily into individual flowers and scatter them over the fabric, you might like to halve your doily and position it on the side, or you might like to place it in the centre like I have. It's completely up to you.  I pressed my piece of linen in half so that I knew where to find the exact centre point.


4. Pin your doily in place.


5. Sew your doily onto your linen.

  • If your doily is not too open a weave, use your sewing machine to sew around the parts of the doily that might lift.  This will be the edges and anywhere else in the centre.  I sewed around each individual flower in this case using a straight stitch.
  • Additionally, I generally then hand-sew the crochet edge of my doilies down, so that they remain open and don't curl and lift on the edges.  In this case I have not, because the doily was already secure enough.
  • If your doily has a very open weave, you may need to hand sew the whole piece on.


After you've finished, the back of your linen should look something like this:


And the front like this:


6. Pin your lining and linen exterior with right sides together.  


7. Sew around the border
Make sure you leave a small gap for turning inside out.


8.  Turn your fabric inside out 

  • Trim the corners and turn the fabric piece out through the hole you left at the edge.
  • Push the corners out with your finger or a turning tool (like a chopstick)


9.  Close your open edge.
Press the raw open edge under and top stitch the hole closed very close to the edge of your fabric.


Now you should have one piece of fabric with the lining on one side, and linen/doily on the other.


10.  Create your casing for the drawstring.

  • Fold each of the short ends of your fabric down towards the lining by approximately 2cm.
  • Stitch close to the edge of the fabric (away from the folded edge) to create a casing.
  • Do this at both ends.


11. Sew the bag together

  • Fold the bag with exterior linen sides together and pin.
  • Stitch from your casing seam at one end down the side to the base of the bag.
  • Repeat this on the other side, making sure that you do not sew across the casing at the top of the bag.


12.  Turn your bag the right way out and press.

13. Thread your ribbon/string
Attach a safety pin to the end of your ribbon or string and thread it through your casing.You can choose to thread one piece through each side, and tie off both ends together as I have, or thread one piece through the whole casing, and tie only once on one side.


Once you've done this, your gift bag is complete!  Make these bags as large or small as you'd like.  The size I made is great for small items like jewellery or handmade sweets.  The best bit is you made it with love, and it's re-usable!  I'm sure you could think of lots of uses.


Enjoy!!


 [This tutorial is permitted to be used for personal use only and not for commercial purposes.  Please do not reproduce or re-post this tutorial in print or online without permission]