My handmade Christmas is well underway here in an attempt to stay organised and not too stressed. Last weekend I made up these necklaces for Miss 4's preschool teachers. I first spotted this fantastic idea over at
Pip's and thought it was worth a go. It totally was!
They were such fun to do, really quick and easy, and something that Ellie could help with threading for her teachers - exactly the kind of project I needed for my teacher gifts. Unfortunately the teachers always seem to be the last thing I get to, and I really try to avoid giving chocolates (having seen the amount of food my teacher friends receive - enough to last the century!!).
How to!
A few of my friends have already asked me how it's done, so here's how I made mine (I'm sure there are lots of different ways!):
1. Head to your local art/craft shop and buy some 'Fimo soft' polymer clay (or 'Sculpey' as an alternative) as well as some durable / strong cord. I just used cotton braided thread. I got about 10-14 beads out of one 85g packet, but you may get more or less depending on the size of your beads.
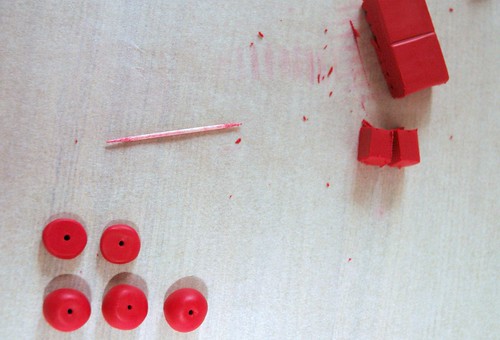
2. Cut your clay evenly on a hard surface - dividing the clay into even portions will obviously give you beads around the same size. I worked with mine on the dining table protected by baking paper as the colour does come out of the darkly pigmented clay. If you don't want any colour to mix between beads, my advice is to change your baking paper and wash your hands for each colour used as there are a few clay crumbs. If you want, you can combine and marble colours. There are some good youtube videos on how to do that, but I preferred mine as a block colour for now.
3. Form your beads to a desired shape and create a hole big enough to thread, depending on the thread you're using - I used a toothpick for mine, but you really could use anything that works in the same way. Make sure you check the hole size before you bake the whole batch, the clay should be firm enough to do this. The sky really is the limit with the shapes and kinds of beads you make - be creative and try something really interesting!
4. Lay the beads onto baking paper lined tray and bake exactly as directed on the packet. Take care with the oven temp and length of time you bake - I used a separate oven thermometer to ensure it didn't overheat as I have heard that the fumes from overheated polymer clay aren't too healthy.
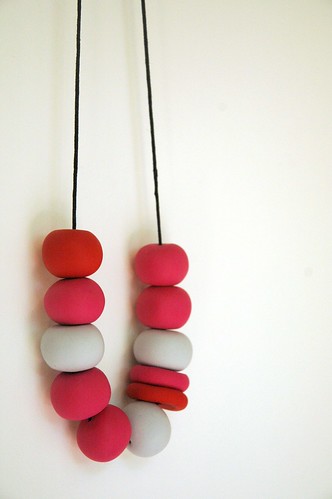
5. Once cooled completely, thread onto string as desired and tie a secure knot.
6. Gift (or wear) your lovely new necklace!
For me, the hardest bit was regulating my oven temperature to 110 degrees C as my thermostat is completely hopeless but despite that, this batch came out well, so I'm planning on making a couple more batches for special people and stocking fillers. I'm also giving myself a few days between batches as rolling out the clay gave me a bit of a sore hand for the rest of the day
(nothing serious but pace yourself and don't overdo it with hundreds and hundreds of beads. Trust me, I know a bit about hands).
I hope they appreciate the idea - what do you think? Would you like to receive something like this?