

How to!
A few of my friends have already asked me how it's done, so here's how I made mine (I'm sure there are lots of different ways!):
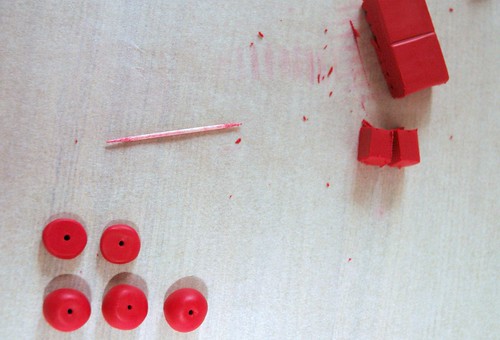
1. Head to your local art/craft shop and buy some 'Fimo soft' polymer clay (or 'Sculpey' as an alternative) as well as some durable / strong cord. I just used cotton braided thread. I got about 10-14 beads out of one 85g packet, but you may get more or less depending on the size of your beads.
2. Cut your clay evenly on a hard surface - dividing the clay into even portions will obviously give you beads around the same size. I worked with mine on the dining table protected by baking paper as the colour does come out of the darkly pigmented clay. If you don't want any colour to mix between beads, my advice is to change your baking paper and wash your hands for each colour used as there are a few clay crumbs. If you want, you can combine and marble colours. There are some good youtube videos on how to do that, but I preferred mine as a block colour for now.
3. Form your beads to a desired shape and create a hole big enough to thread, depending on the thread you're using - I used a toothpick for mine, but you really could use anything that works in the same way. Make sure you check the hole size before you bake the whole batch, the clay should be firm enough to do this. The sky really is the limit with the shapes and kinds of beads you make - be creative and try something really interesting!
4. Lay the beads onto baking paper lined tray and bake exactly as directed on the packet. Take care with the oven temp and length of time you bake - I used a separate oven thermometer to ensure it didn't overheat as I have heard that the fumes from overheated polymer clay aren't too healthy.
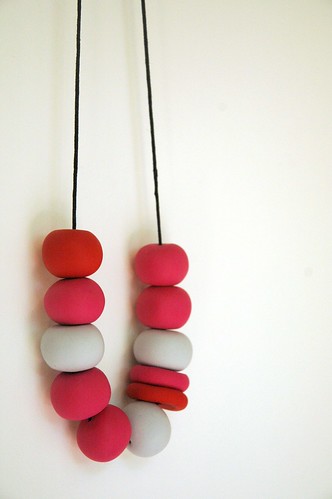
5. Once cooled completely, thread onto string as desired and tie a secure knot.
6. Gift (or wear) your lovely new necklace!
For me, the hardest bit was regulating my oven temperature to 110 degrees C as my thermostat is completely hopeless but despite that, this batch came out well, so I'm planning on making a couple more batches for special people and stocking fillers. I'm also giving myself a few days between batches as rolling out the clay gave me a bit of a sore hand for the rest of the day (nothing serious but pace yourself and don't overdo it with hundreds and hundreds of beads. Trust me, I know a bit about hands).
I hope they appreciate the idea - what do you think? Would you like to receive something like this?
I think they'll love them! I'd love some too!
ReplyDeleteUmm . . . YES! Beautiful work. I am thinking of doing the same for the girls in my family. You have spurred me on! xxx
ReplyDeleteThese are really lovely Gret! I bet the teachers will love them. I'm embarrassed to admit our teachers are getting (very good!) chocolates this year, because I'm very time poor (we are heading o/s this week so the kids even get a big early mark), but next year will be a different story. Thanks for a great idea. Have a lovely Christmas!
ReplyDeleteThey look lovely and I'm sure the teachers will like them too! I would totally like to receive something like that. Thanks for the tute as well, will keep it in mind as something quick and pretty to make for a gift :)
ReplyDeletewonderful! We did some the other weekend and now we've got some more in different colours to thread on! I agree with the pace yourself suggestion...after rolling out 3 packets my hands had had enough! Your necklaces are wonderful colours and will make great gifts x
ReplyDeleteYour necklaces are gorgeous! The teachers will love them! Unfortunately my daughters teacher is male or I would have definitely copied! I'm inspired to make some though for myself!
ReplyDeletelove them , there is a product called clay conditioner to help soften the clay if it is too hard for sore hands.(I use it when my arthritis in my wrist is bad )Janet HAmer
ReplyDeleteI would love to receive something like that! They are fantastic!
ReplyDeleteLovely!! Speaking from experience, I would much prefer this to chocolates or soap :) Something to treasure x
ReplyDeleteThey look beautiful! And I hear you about the hands, it is quite a work out when you do more than a few colours at once. I have ten blocks just waiting for me at the moment, but I will break them up in to two lots! :)
ReplyDelete